Aim for wall art that spans 60% to 75% of the furniture width beneath it, or roughly two-thirds of the width on an empty wall. Hang it so the visual center sits around eye level, generally near 57 to 60 inches from the floor, and leave a comfortable gap (about 6 to 10 inches) between the top of your sofa, bed, or console and the bottom of the frame. Get those three numbers right and almost any piece will look intentional instead of accidental.
TL;DR:
- Most art should be between 60% and 75% of the furniture width, or about two-thirds on an empty wall, for a balanced look.
- Use the formula of furniture width multiplied by 0.6 and 0.75 to determine the ideal art width; adjust for room height and visual weight.
- When creating gallery walls, measure the entire layout, then apply the same 60-75% rule to the total width rather than individual frame sizes.
- Hang artwork so its visual center is around 57 to 60 inches high, with 6 to 10 inches of space between the art and furniture, adjusting for room and ceiling height.
- Always mock up sizes on the wall with tape or paper before buying or hanging, as physical placement reveals proportion and scale issues unseen in calculations.
Table of Contents
- What Is the Wall Art Size Guide Formula?
- Room-By-Room Wall Art Dimensions
- Standard Print Sizes and Aspect Ratios to Know
- Getting the Hanging Height and Spacing Right
- Sizing a Gallery Wall Like One Piece
- How to Test Your Size Before You Buy
- Avoiding the Most Common Sizing Mistakes
- Why Most Sizing Guides Miss the Point
- Ready-to-Print Wall Art Sized for This Guide
- Sources
- FAQ
What Is the Wall Art Size Guide Formula?
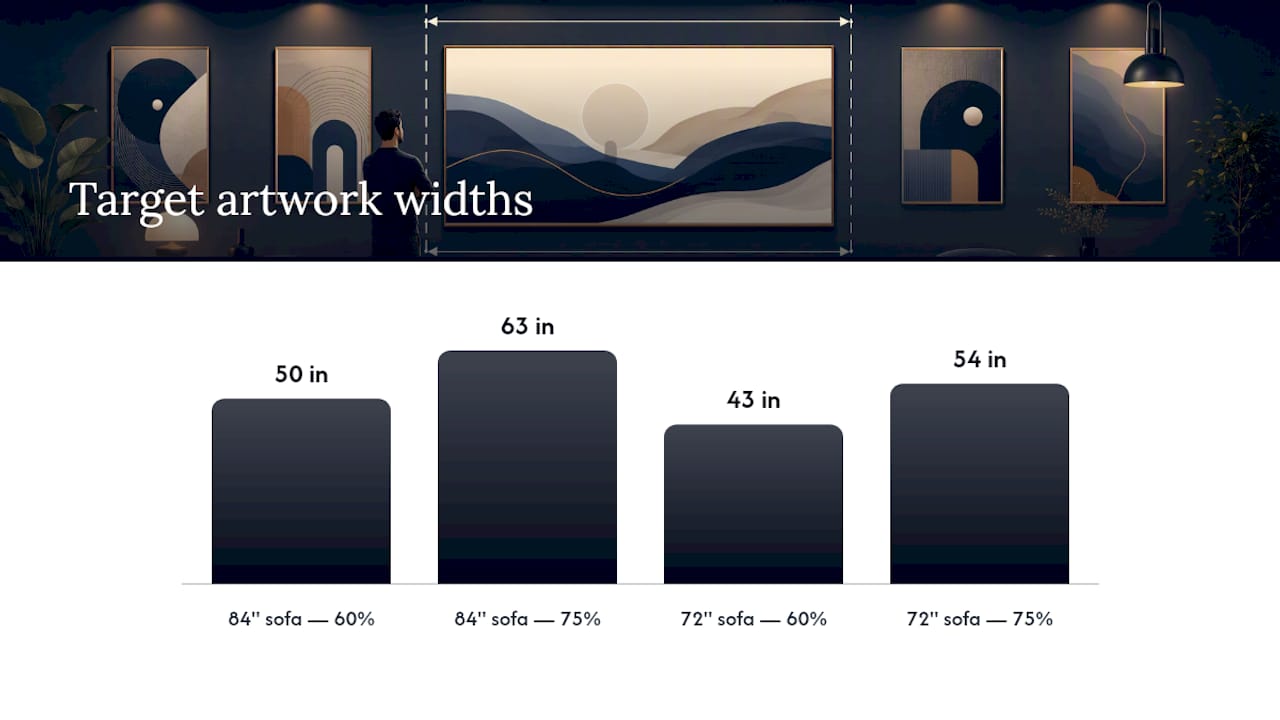
The math behind this wall art size guide is simple enough to do in your head. Take the width of the furniture piece you're hanging art above, then multiply it by 0.6 and by 0.75. That range is your target width for the art.
For a wall with no furniture reference point, such as a stairwell landing or an open expanse, use about two-thirds of the usable wall width instead, and subtract any space eaten up by windows, doorways, or trim.
Here's how that plays out on two common sofa sizes:
- 84-inch sofa: multiply by 0.6 and 0.75 to get a target range of roughly 50 to 63 inches wide. A 24x36 canvas paired with a smaller companion piece, or one wide horizontal print, both land in that zone.
- 72-inch sofa: the same math puts you at about 43 to 54 inches. A single 40x30 piece or two 16x20 prints hung side by side both work.
When you're torn between two sizes in that range, lean toward the larger end if your ceilings run 9 feet or taller, if the room reads as sparse or minimalist, or if you're hanging a single statement piece rather than a grouping. Lean smaller if the wall already carries a lot of visual weight from patterned furniture, a bold rug, or an accent wall color.
Room-By-Room Wall Art Dimensions
Sizing rules shift slightly depending on the room, because seating distance and sightlines change how large a piece needs to feel balanced.
- Living room, 72-inch sofa: single piece around 43 to 54 inches wide, or a pair of 16x20s with a few inches of gap between them.
- Living room, 84 to 96-inch sofa: single statement piece in the 50 to 70 inch range, or a three-piece grouping whose combined width (frames plus gaps) hits that same target.
- Bedroom, queen headboard (about 60 inches): aim for 36 to 45 inches of art, either one horizontal piece centered above the headboard or a symmetrical pair flanking the middle.
- Bedroom, king headboard (about 76 inches): target 46 to 57 inches; a single oversized piece tends to read better over a king than a scattered cluster.
- Dining room or buffet: since diners view art while seated, drop the visual center to about 54 inches and size art to 60 to 75% of the buffet or table width.
- Entryway, hallway, or stairwell: narrow sightlines favor portrait orientation and a smaller footprint. A vertical 12x16 or 16x20 print reads better here than a wide horizontal piece.
- Home office: for video calls, size and place art within the camera's visible backdrop, usually a 24 to 36 inch band centered behind your seated head and shoulders.
A Moonlit Celestial Study printable wall art piece, for instance, works well in that bedroom or living room range once you've settled on your target width.
Standard Print Sizes and Aspect Ratios to Know
Before you fall in love with a specific piece, settle on the aspect ratio family it belongs to. This one decision prevents most cropping headaches and keeps framing costs predictable, since standard frames are built around a handful of ratios rather than infinite custom dimensions.
Common US sizes cluster into a few recognizable ratio families:
A framed or matted piece occupies more wall space than the print size alone. For example, a 2 or 3 inch mat border on a 16x20 print can increase the total footprint significantly, so include framing dimensions when calculating the art size relative to your furniture.
Getting the Hanging Height and Spacing Right
Once you've picked a size, hanging height determines whether it actually looks right. The industry standard, borrowed from gallery installation practice, puts the visual center of the artwork at 57 to 60 inches from the floor, roughly average eye level.
A few adjustments matter:
- Drop the center to about 54 inches in rooms where people are usually seated, like dining rooms.
- Leave 6 to 10 inches of breathing room between the top of furniture and the bottom of the frame.
- Space multiple frames 2 to 3 inches apart so they read as a set rather than a scattered collection.
- Push the center height up by 10% to 20% in rooms with ceilings above 9 feet, and pull it down slightly over very low furniture like a bench or daybed.
Sizing a Gallery Wall Like One Piece
The trick to a gallery wall that doesn't look chaotic is treating the whole arrangement as a single unit. Measure the outer edges of your planned layout, from the leftmost frame edge to the rightmost, and apply the same 60 to 75% rule to that combined width, not to each frame individually.
- Pick an anchor piece, usually the largest, and build the rest of the arrangement around it rather than scattering equal-sized frames.
- Keep gaps consistent, 2 to 3 inches between every frame, so the eye reads rhythm instead of randomness.
- Mock it up on the floor first, arranging the actual frames in your layout before anything touches the wall, then transfer that spacing with taped paper templates.
How to Test Your Size Before You Buy
Skip the calculator apps and go analog. Cut paper or use painter's tape to outline the exact frame dimensions directly on the wall, then live with it for a day to see it in changing light.
- Tape the outline at the height and width you're considering and check it morning, afternoon, and evening.
- Check the image file's pixel dimensions against your intended print size. For prints up to 16x20 inches viewed up close, aim for 300 DPI; for oversized pieces viewed from several feet away, 150 to 200 DPI is often fine.
- Measure the framed footprint, frame plus mat, not just the print size, and account for canvas wrap depth if you're going frameless.
Pro Tip: Take a photo of the taped outline on your phone and compare it against photos of the furniture from across the room. Flat photos reveal proportion problems your eye glosses over in person.
Avoiding the Most Common Sizing Mistakes
The single most common error is buying too small. Designers generally advise sizing up when you're torn between two options, since undersized art is the most frequent regret buyers report, while an oversized piece rarely feels wrong.
- Buying too small: recalculate using furniture width, not wall width, and lean toward the top of your 60 to 75% range.
- Hanging too high: measure down from the ceiling instead of up from the floor and you'll almost always overshoot; stick to the 57 to 60 inch center line.
- Ignoring frame and mat depth: add 2 to 4 inches to your print dimension before checking it against your target range.
| Step | Action |
|---|---|
| 1. Measure | Furniture width, not wall width |
| 2. Multiply | Width by 0.6 and 0.75 for your range |
| 3. Mock up | Tape or paper template on the wall |
| 4. Check DPI | 300 DPI for close viewing, 150 to 200 for large pieces |
| 5. Hang | Center at 57 to 60 inches, adjust for seated rooms |
Why Most Sizing Guides Miss the Point
It doesn't. The rule exists to stop a piece from looking marooned on a big wall or crammed above a small console, and that's a judgment call as much as a calculation. Two rooms with identical sofa widths can call for different art sizes depending on ceiling height, existing pattern, and how much negative space the room can absorb.
The step people skip isn't the math, it's the mockup. Paper templates and painter's tape catch problems that a calculator never will, because they show you the piece in your actual light, against your actual furniture, at the actual time of day you'll be looking at it. That's also why celestial and nature-themed prints, the kind featured across our collection at Cosmicgoddessshop, tend to forgive small sizing misses better than busy graphic prints. Their softer compositions have more visual give at the edges.
— Addie
Ready-to-Print Wall Art Sized for This Guide
Printable wall art designs often come as instant downloads built around standard sizes and aspect ratios, from 8x10 up through 24x36. You can choose your target range using the furniture math above, then pick the file size that matches, no cropping, no resizing, no waiting on shipping.

The Celestial Garden Orbit printable wall art is a strong place to start if you're filling that 50 to 63 inch range above a standard sofa, and the Solar Queen Goddess printable wall art works well as a bedroom or office anchor piece once you've settled on your dimensions. Both are available for print at home or through a local print shop for a framed finish. Browse the full printable wall art catalog to find a design sized for your exact wall.
Sources
For deeper reference, the Uplift Fine Art sizing guide covers furniture-based sizing in more detail, Trendlytic's size chart lists standard print dimensions, Canvas Discount's DPI guide explains resolution requirements, and PrintStudio's chart breaks down gallery wall math in inches and centimeters.
- How to Choose the Right Wall Art Size for Every Room | Upliftfineart
- Standard Art Print Sizes: Wall Art Size Chart · Trendlytic
- Wall Art Size Guide: How to Choose the Right Size for Every Wall - Lume & Wick
- What Size Wall Art Do You Need? Complete Chart (in + cm) | PrintStudio
FAQ
What size art do I need for my wall?
Measure the furniture below it and multiply that width by 0.6 and 0.75 to find your target range; for an empty wall, use about two-thirds of the usable width instead.
What is the 2/3 rule for wall art?
It means your artwork should occupy roughly two-thirds of the width of the furniture or wall space it's paired with, landing you in that 60 to 75% target range designers use.
What is the most popular wall art ratio?
The 2:3 ratio, seen in sizes like 20x30 and 24x36, is one of the most common choices for large statement prints, alongside the 4:5 ratio used in 8x10 and 16x20 sizes.
Does Cosmicgoddessshop sell wall art in standard sizes?
Yes, Cosmicgoddessshop offers instant-download printable wall art built around standard US print sizes and aspect ratios, ready to print at home or send to a print shop for framing.